PyTorch (10) Autoencoder
Autoencoderの実験!MNISTで試してみよう。
180221-autoencoder.ipynb - Google ドライブ
28x28の画像 x をencoder(ニューラルネット)で2次元データ z にまで圧縮し、その2次元データから元の画像をdecoder(別のニューラルネット)で復元する。ただし、一度情報を圧縮してしまうので完全に元の画像には戻らず再構成した画像 xhat は入力画像の近似となる。

さっそくやってみよう。まずはいつもの。
import os
import numpy as np
import torch
import torchvision
from torch import nn
from torch.autograd import Variable
from torch.utils.data import DataLoader
from torchvision import transforms
from torchvision.datasets import MNIST
from torchvision.utils import save_image

cuda = torch.cuda.is_available()
if cuda:
    print('cuda is available!')

num_epochs = 100
batch_size = 128
learning_rate = 0.001
out_dir = './autoencoder'

if not os.path.exists(out_dir):
    os.mkdir(out_dir)
データ変換関数。MNISTは ToTensor() すると [0, 1] になるので0.5を引いて0.5で割って [-1, 1] の範囲に変換する。
img_transform = transforms.Compose([
    transforms.ToTensor(),
    transforms.Normalize((0.5, 0.5, 0.5), (0.5, 0.5, 0.5))  # [0,1] => [-1,1]
])
train_dataset = MNIST('./data', download=True, transform=img_transform)
train_loader = DataLoader(train_dataset, batch_size=batch_size, shuffle=True)
Autoencoderのモデルを作成。encoder と decoder を定義する。別々に定義しておくとEncoder・Decoderを独立して使えるので便利(あとでEncoderのみ使う例を示す)。
Encoderは普通の多層ニューラルネットで784 => 128 => 64 => 12 => 2 と2次元まで圧縮してみた。2次元まで圧縮すると潜在空間を描画できる。逆にDecoderは2 => 12 => 64 => 128 => 784 と元の画像サイズまで戻す。入力画像は [-1, 1] に標準化したので出力の活性化関数には tanh を使う(tanhは出力の範囲が [-1, 1])。EncoderとDecoderで重みは共有せずにそれぞれ別に学習する*1。
class Autoencoder(nn.Module):

    def __init__(self):
        super(Autoencoder, self).__init__()
        self.encoder = nn.Sequential(
            nn.Linear(28 * 28, 128),
            nn.ReLU(True),
            nn.Linear(128, 64),
            nn.ReLU(True),
            nn.Linear(64, 12),
            nn.ReLU(True),
            nn.Linear(12, 2))

        self.decoder = nn.Sequential(
            nn.Linear(2, 12),
            nn.ReLU(True),
            nn.Linear(12, 64),
            nn.ReLU(True),
            nn.Linear(64, 128),
            nn.ReLU(True),
            nn.Linear(128, 28 * 28),
            nn.Tanh()
        )

    def forward(self, x):
        x = self.encoder(x)
        x = self.decoder(x)
        return x

model = Autoencoder()
if cuda:
    model.cuda()
Autoencoder(
  (encoder): Sequential(
    (0): Linear(in_features=784, out_features=128)
    (1): ReLU(inplace)
    (2): Linear(in_features=128, out_features=64)
    (3): ReLU(inplace)
    (4): Linear(in_features=64, out_features=12)
    (5): ReLU(inplace)
    (6): Linear(in_features=12, out_features=2)
  )
  (decoder): Sequential(
    (0): Linear(in_features=2, out_features=12)
    (1): ReLU(inplace)
    (2): Linear(in_features=12, out_features=64)
    (3): ReLU(inplace)
    (4): Linear(in_features=64, out_features=128)
    (5): ReLU(inplace)
    (6): Linear(in_features=128, out_features=784)
    (7): Tanh()
  )
)
変換したテンソルを元の画像に戻す関数。
def to_img(x):
    x = 0.5 * (x + 1)  # [-1,1] => [0, 1]
    x = x.clamp(0, 1)
    x = x.view(x.size(0), 1, 28, 28)
    return x
訓練ループ。Autoencoderはラベルは使わない。ターゲットは入力画像そのものとなる。Loss関数は入力と出力の間の平均二乗誤差とする。つまり、出力が入力に近づくように学習する。
criterion = nn.MSELoss()
optimizer = torch.optim.Adam(model.parameters(),
                             lr=learning_rate,
                             weight_decay=1e-5)

loss_list = []

for epoch in range(num_epochs):
    for data in train_loader:
        img, _ = data
        x = img.view(img.size(0), -1)
        if cuda:
            x = Variable(x).cuda()
        else:
            x = Variable(x)

        xhat = model(x)

        # 出力画像(再構成画像)と入力画像の間でlossを計算
        loss = criterion(xhat, x)

        optimizer.zero_grad()
        loss.backward()
        optimizer.step()

        # logging
        loss_list.append(loss.data[0])

    print('epoch [{}/{}], loss: {:.4f}'.format(
        epoch + 1,
        num_epochs,
        loss.data[0]))

    # 10エポックごとに再構成された画像(xhat)を描画する
    if epoch % 10 == 0:
        pic = to_img(xhat.cpu().data)
        save_image(pic, './{}/image_{}.png'.format(out_dir, epoch))

np.save('./{}/loss_list.npy'.format(out_dir), np.array(loss_list))
torch.save(model.state_dict(), './{}/autoencoder.pth'.format(out_dir))
実験結果
学習曲線。普段はエポックごとにロギングするんだけど今回はミニバッチごとにロギングしてた・・・その場合は横軸はepochではなく、iterationになる。
loss_list = np.load('{}/loss_list.npy'.format(out_dir))
plt.plot(loss_list)
plt.xlabel('iteration')
plt.ylabel('loss')
plt.grid()

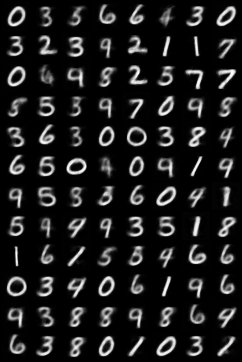
Jupyter Notebook上で保存した画像を描画してみよう。今回は再構成した画像のみ。入力画像も一緒に表示したほうがわかりやすかったかも。
from IPython.display import Image
Image('autoencoder/image_0.png')

Image('autoencoder/image_90.png')

潜在空間の可視化
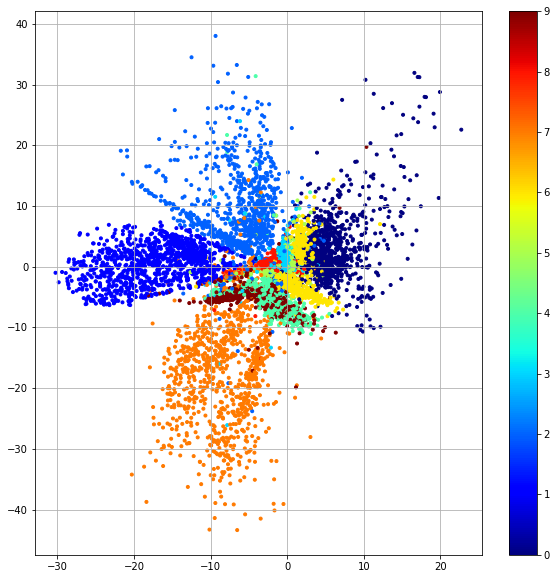
テストデータ10000画像をEncoderで潜在空間にマッピングして各画像がどのように分布するか可視化してみよう。ここでは、Encoderしか使わない。先のようにモデルを定義しておくと、model.encoder() でエンコーダだけ呼び出せる。
model.load_state_dict(torch.load('{}/autoencoder.pth'.format(out_dir),
                                 map_location=lambda storage,
                                 loc: storage))

test_dataset = MNIST('./data', download=True, train=False, transform=img_transform)
test_loader = DataLoader(test_dataset, batch_size=10000, shuffle=False)

images, labels = iter(test_loader).next()
images = images.view(10000, -1)

# 784次元ベクトルを2次元ベクトルにencode
z = model.encoder(Variable(images, volatile=True)).data.numpy()
zは (10000, 2) となり、784次元の画像が2次元データになっていることがわかる。
import pylab
import matplotlib.pyplot as plt
%matplotlib inline

plt.figure(figsize=(10, 10))
plt.scatter(z[:, 0], z[:, 1], marker='.', c=labels.numpy(), cmap=pylab.cm.jet)
plt.colorbar()
plt.grid()

各数字のデータがばらついて分布していることがわかる。つまり、2次元の潜在空間上では各数字を分離しやすいことを意味する。
ここでは潜在空間の分布の範囲にも注目!x軸方向が -30〜20 でy軸方向が -40〜40 あたりに散らばっていることがわかる。次回、AutoencoderをVariational Autoencoder (VAE)に拡張する予定だがVAEだと潜在空間が正規分布 N(0, I) で散らばるようになる。
参考
*1:tied weightsというencoderとdecoderが重みを共有する実装もある